There’s no better pizza than one made with a sourdough pizza crust. You will be surprised at how easy it is to create a quality, flavorful sourdough pizza crust! With just flour, salt, water, and a sourdough starter, this crust comes together in just a few simple steps.
Sourdough Pizza Dough (no yeast)
By no yeast, I mean this is an authentic sourdough pizza crust without any packaged yeast.
The ingredients are simple, and you can add other ingredients. For example, add basil, thyme, and oregano to the dough to make a herbed sourdough crust.
Add a few teaspoons of minced garlic to the dough if you like garlic crust. You can even make a cheesy crust for extra cheesy pizza flavor! Add a bit of grated parmesan to the dough mix.
For a classic and simple crust, you need the following:
- All-purpose or bread flour
- salt
- water
- sourdough starter

Make-Ahead Sourdough Pizza Crust
When I make this recipe, sometimes I like to go ahead and make a lot. I like to freeze some of the dough for later, it is easy use!
To freeze pizza dough:
- Divide the dough into balls that are big enough to make an individual pizza.
- Next, lightly coat the pizza dough balls with oil. (I like to use olive oil, but vegetable oil works too)
- Place the dough ball into a freezer bag and tightly seal it closed. Make sure you remove all the air from the bag.
- You can store the dough in the freezer for three to four months.
How to Shape the Sourdough Pizza Crust (with pictures)
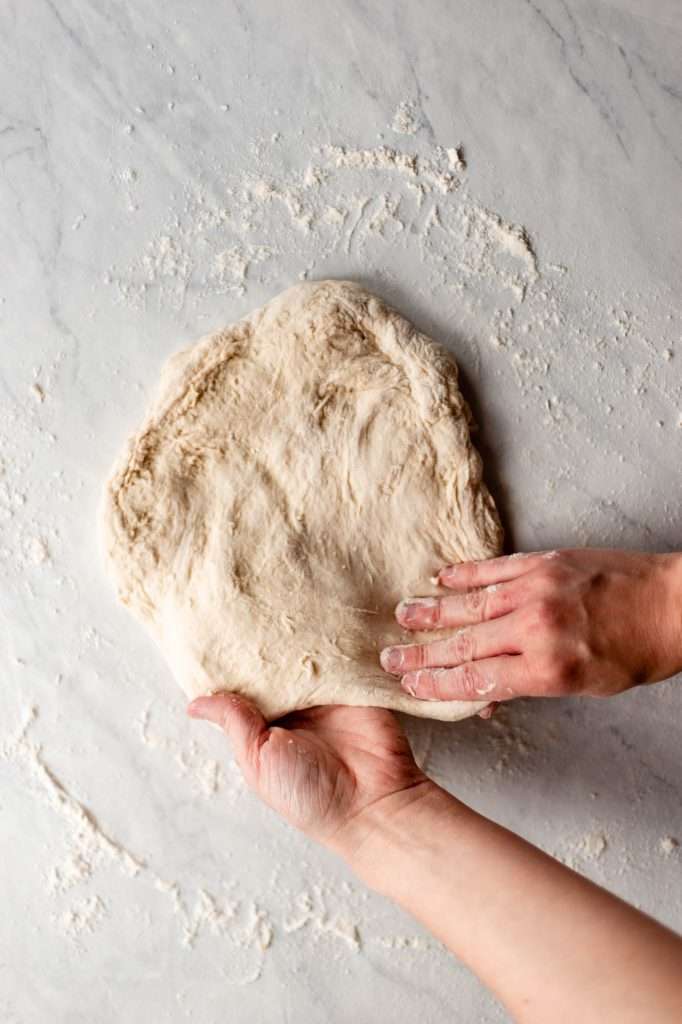
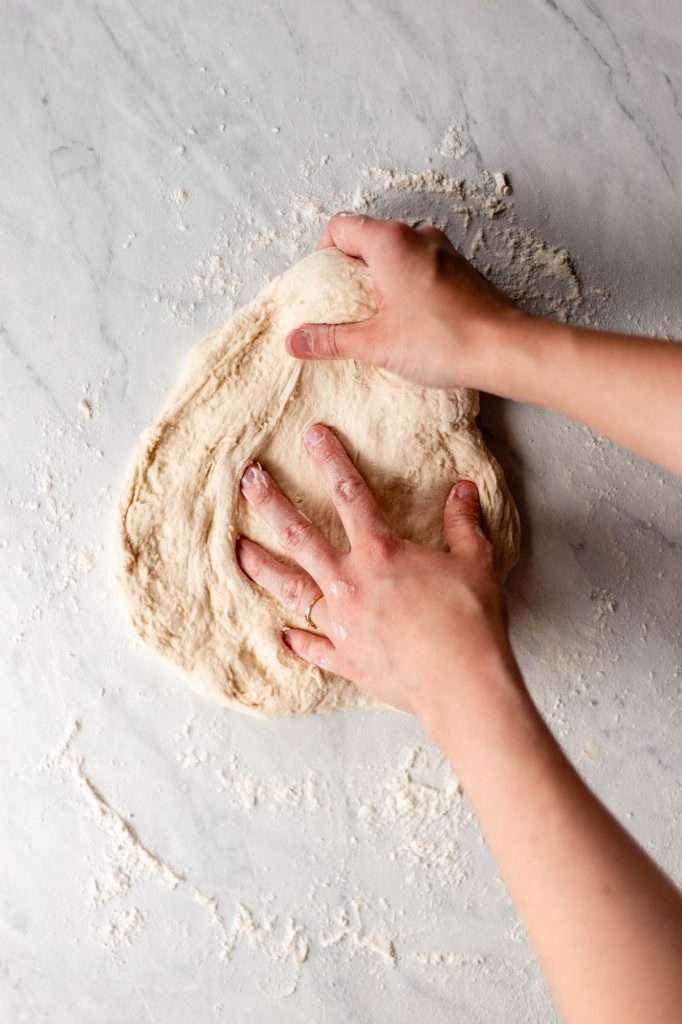
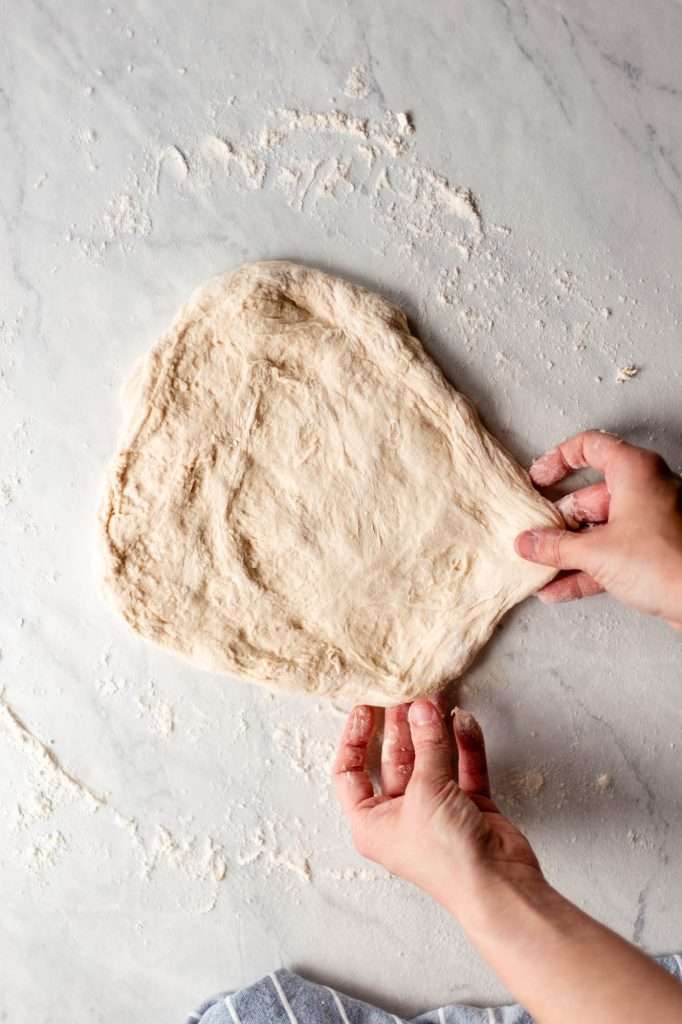
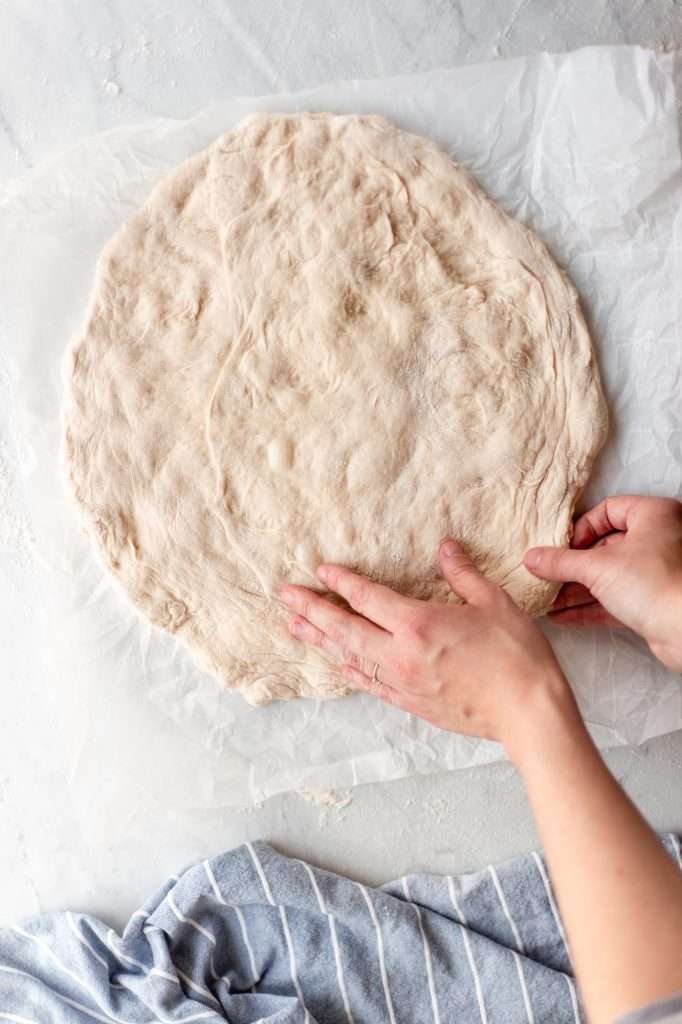
Place the dough ball on a floured surface and gently begin pulling the dough into a circular shape.
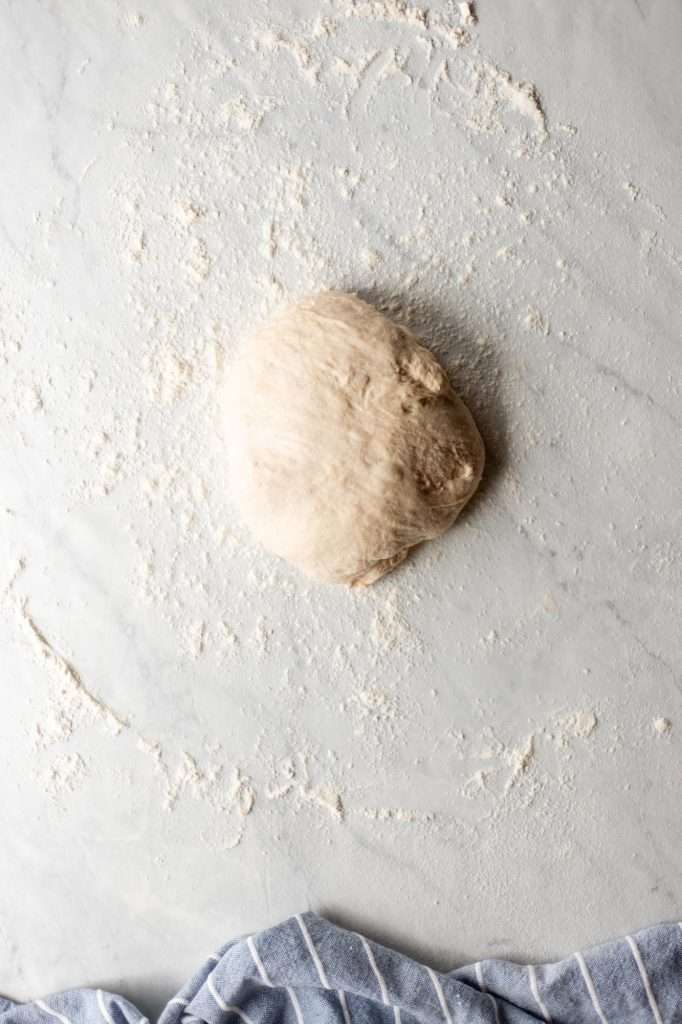
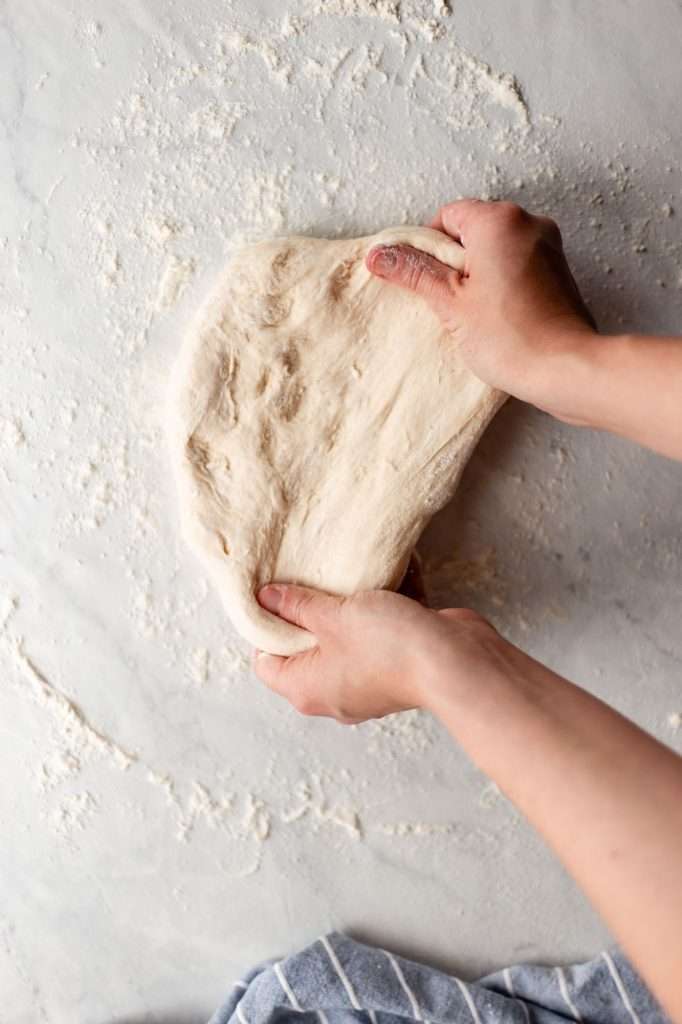
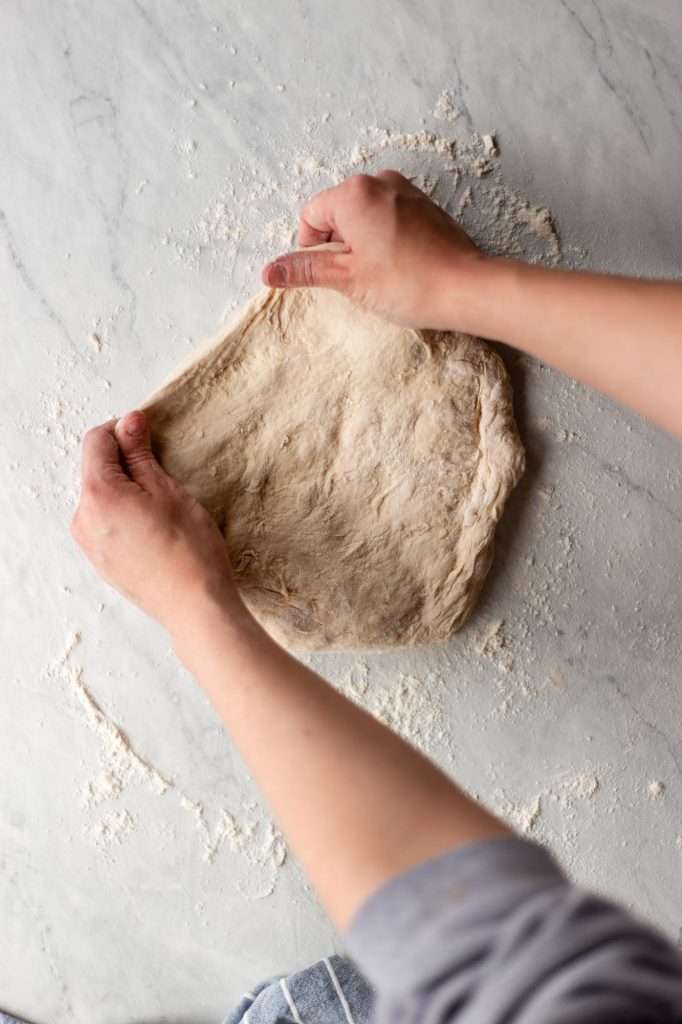
Be gentle, keeping the air and bubbles in the dough. Work the dough from the thicker spots, avoiding making holes in the dough.
How to Cook a Pizza With This Crust
To make a pizza with this crust, you need sauce, your favorite pizza toppings, and your favorite cheese!
The key to making a quality pizza with this crust is patience. After the overnight refrigerator proof, you need to let the crust temper and rise properly. When pulling out the dough, sprinkle with enough flour and be gentle. You do not want to roll out this crust with a rolling pin; you want to keep all the fluffy bubbles intact.
The other key to making pizza with this dough is temperature. You want the oven on the hottest setting (mine is 525° F). My favorite way to cook pizza with a sourdough crust is on the grill outside because the grill gets to way higher temperatures.
Crispy Sourdough Pizza Crust
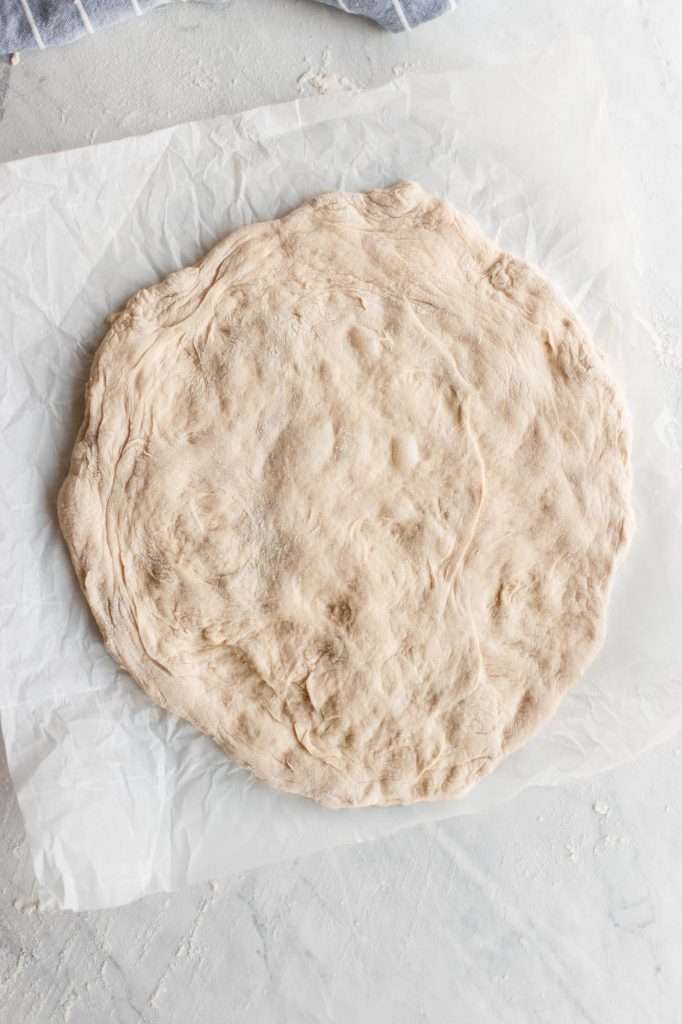
Either way, using an oven or a grill, I suggest using a pizza stone and parchment paper. First, place the pulled-out pizza dough on a parchment paper-lined flat pan before dressing the dough with ingredients.
Preheat your oven or grill with a pizza stone. Once you are ready to cook, slide the parchment paper with the pizza onto the hot pizza stone. The total cooking time here is about 10 minutes on a grill and about 15 in the oven. Halfway through the cooking time, put on an oven mitt, grab the front edge of the parchment paper, and swiftly rip it out from under the pizza. It should slide right out. Allow the pizza to finish cooking to your liking.
Other Sourdough Recipes to Try
- Easy Sourdough Bread Machine Recipe
- How to Make Sourdough Hamburger Buns
- Sourdough Detroit Style Burrata Pizza with Prosciutto
My Go-To Homemade Sourdough Pizza Crust Recipe
There’s no better pizza than one made with a sourdough pizza crust. You will be surprised at how easy it is to create a quality, flavorful sourdough pizza crust! With just flour, salt, water, and a sourdough starter, this crust comes together in just a few simple steps.
- Prep Time: 10 minutes
- Proofing Time: 6 hours
- Total Time: 6 hours 10 minutes
- Yield: 2 twelve inch crusts
- Category: sourdough
- Method: fermentation
- Cuisine: Italian
- Diet: Vegan
Ingredients
- 480 grams all-purpose flour
- 300 grams water
- 100–200 grams active sourdough starter
- 15 grams sea salt
Instructions
- This recipe includes overnight proofing. I suggest starting this dough at noon, the day before you need it.
- Combine all ingredients in a large bowl, mix just until a shaggy, rough dough ball forms.
- Allow the dough to rest covered for 1 hour.
- With wet hands, lightly wet the outside of the dough. (I like to just rinse my hands under the faucet and rub the outside of the dough.
- Gently stretch and pull up one side of the dough, without breaking it. Fold it over the other side. Repeat on all sides. You should notice the dough getting smoother.
- Allow the dough to rest covered for one hour.
- Repeat steps 4 and 5.
- Allow the dough to rise, covered at room temperature for 2 hours.
- Repeat steps 4 and 5.
- Allow the dough to rise at room temperature, covered for 2 hours.
- Cover the bowl of dough with plastic wrap or reusable wax-coated wrap. Place in the fridge overnight for 8 to 12 hours.
- The next morning, remove the dough from the fridge and let it sit at room temperature for 2 hours.
- Divide the dough into even pieces for the size pizza you desire. (this recipe at 1x makes two 12 inch pizzas)
- You can stop here and freeze the dough for later. Use the instructions above in the body of this blog post to freeze the dough or continue to the next step to prepare for baking a pizza.
- Gently pull out the dough: generously flour your work surface and hands. Place the dough on the floured surface, and lightly dust it with flour. Gently pull out the dough into a circular shape. This is easier than it sounds (reference the photos above). Do not overwork the dough, and try to keep all the bubbles and rise intact.
- Place the pizza crust on a flat pan lined with parchment paper, and you are ready to dress with toppings and bake.
- See blog sections above this recipe for baking instructions and tips.


35 comments
Are there any special thawing directions or is it as easy as take it out of freezer, let it thaw, spread out like your instructions above, add toppings, etc?
Thank you
Yes, you just thaw it until it’s room temperature then continue with the directions.
This pizza dough was so good. My husband said it was the best he had ever had! I made a double batch and put some in the freezer like she said in the blog post. Can’t wait to have it again!
Can you make the whole pizza and freeze it that way? Or does it just have to be the dough?
Though I’ve never tried it, I think it should work!
Have you tried making four 6″ crusts? If so, how was the cooking time affected?
I haven’t. I usually just make one pizza for me and my husband. I’m sure 6″ will work great and if cooking one at a time it will reduce the cooking time by a few minutes.
Do you just leave the dough out all day if you’re making pizza in the evening following dough being refrigerated?
you only need to pull the dough out of the fridge two hours before baking. But leaving it out all day can work too, especially if it’s cool in your house.
This recipe yielded the best pizza dough we’ve ever made by far! My family could not get enough and we will be making this recipe weekly. Thank you so much! Looking forward to gifting some frozen dough to a friend as well.
I’m happy to hear you loved the recipe! pizza dough is a fantastic gift!
Delicious!! I skipped the cold proof and just did a counter proof for about 10 hours! It was super airy, however the cold proof would have most likely made it easier to shape. I did a more “rustic” shape, LOL!
Can you explain the range for starter? How do we know how much to add? Does more starter result in a thicker crust (more rise)? thanks!
more starter gives more flavor, and depending on how thick or liquid your starter is, it can change the texture a little.
So if we have thick starter we use 100grams?
sure, anywhere between 100-200 grams works well. More starter = more flavor.
Can this be mixed in a bread machine on dough cycle?
yep! I do that all the time
Can you make the dough ahead of time and leave in the fridge for a few days or should it be frozen?
you can leave it in the fridge for up to 72 hours!
I started the sourdough starter a few days ago and it has really taken off. I came across your recipe and I thought I’d give it a go . I was overwhelmed by the beautiful sourdough smell as I combined all the ingredients. The dough worked just as you said. Proving now for first hour and will follow your steps. Very excited and so are my 2 girls. Keep your updated.
This is the best pizza dough I’ve ever made from scratch! Excellent chew and the bottom crisped up perfectly. I’ll use this recipe from now on!
Wish I could add a picture to my post. Yum!
This is the best pizza dough I’ve ever made from scratch! Excellent chew and the bottom crisped up perfectly. I’ll use this recipe from now on!
Wish I could add a picture to my post. Yum!
The best pizza dough! It’s a process but so worth it. Believe me, I wouldn’t go do extra work if it weren’t. I have a gluten intolerance at minimum (Positive antibody test) and find that sourdough is so much lighter for me, causing far less bloating and discomfort. This also happens to be my family’s favorite pizza which is saying a lot with 2 young boys who used to love take out pizza! Thanks for a great recipe!
Recipe is working well, however, it would sure be nice to have the baking instructions as a part of the printed recipe…
Thanks for your feedback!
Can I use 00 flour?
yeah that should work
When it says to cover the dough with plastic wrap or reusable wax paper before the cold proof, does that mean over the bowl or do you take the dough out of the bowl and cover? Aka there’s not really a rise?
cover the bowl.
Hi! Do you think it will work with discard? I fed my starter last night around 9pm?
If you’ve fed your starter in the 24 hours prior to making this pizza crust it should work!
My favorite pizza dough by far. Instructions are simple and the dough comes out thin, crispy and delicious. I’m in the middle of making my parents dough so they can have it when they want it. Thank you for this recipe!
Thank you for leaving a review! Sharing pizza dough with your parents is so sweet!