

Roasted Half Chicken Recipe
This roasted half chicken recipe is simple yet extremely impressive, with fantastic flavors and textures. I’ll guide you through the intricacies of preparing a half chicken, the benefits of roasting chicken in halves, and the perfect roasting tips and tricks.

How to Cut a Whole Chicken for Roasted Half Chicken
Removing the backbone and splitting a whole chicken into two halves is an essential skill in poultry preparation, often called “spatchcocking” or “butterflying.” This technique helps the chicken cook more evenly, allowing for better flavor absorption.


Equipment Needed
- A sharp pair of kitchen shears or a good boning knife.
- A cutting board, preferably with a groove to catch any juices.
- Optional: gloves for handling raw chicken.
Steps to Remove the Backbone
- Prepare the Chicken: Start by patting the chicken dry with paper towels. This will give you a better grip and make it easier to cut.
- Position the Chicken: Place the chicken breast-side down on the cutting board, with the legs pointing towards you.
- Locate the Backbone: The backbone runs along the center of the back, from the neck to the tail end.
- Start Cutting: Cut along one side of the backbone using your kitchen shears or knife. Begin at the tail end (or the neck end, if you find it easier), and cut through to the other end. Apply firm, even pressure, and stay as close to the backbone as possible to maximize the meat on the breast.
- Cut the Other Side of the Backbone: Repeat the process on the other side of the backbone. It’s essential to keep your cuts symmetrical to ensure even cooking later.
- Remove the Backbone: Once you’ve cut along both sides of the backbone, lift and remove it. You can save the backbone for making stock or broth later.
Splitting the Chicken into Two Halves
- Open the Chicken: With the backbone removed, open the chicken outwards so it lies flat, skin-side down.
- Locate the Breastbone: The breastbone (or keel bone) is a rigid, white cartilage structure running along the center of the breast.
- Cut Along the Breastbone: Make a small incision along one side of the breastbone using your shears or knife. This initial cut will help guide the rest of your cutting.
- Split the Chicken: Carefully cut through the breastbone and cartilage, working your way down the length of the chicken. You will need to apply some pressure here, as the breastbone can be tough.
- Separate into Halves: Once you’ve cut through the breastbone, continue your cut through the front of the chicken, effectively dividing it into two halves.
- Trim Excess Fat: Trim any excess skin or fat that may have been unevenly cut during the process.
Tips for Success
- Take your time and focus on making clean cuts.
- Keep the skin intact as much as possible for better flavor and moisture retention during cooking.
- Always work on a stable surface to prevent accidents.

Honey Miso Butter Rub for Roasted Half Chicken
Miso is a fermented paste typically made from soybeans, salt, and koji (a type of fungus). Here’s an in-depth look at the different types of miso I recommend for this recipe:
White Miso (Shiro Miso):
- Characteristics: This is the mildest type of miso. Artisans make white miso from soybeans and salt, with a large percentage of rice koji. The color ranges from white to light beige.
- Flavor Profile: It has a gentle, sweet taste and mild saltiness, making it a versatile ingredient.
- Culinary Uses: Ideal for dressings, marinades, and light soups.
Red Miso (Aka Miso):
- Characteristics: Red miso undergoes a longer fermentation process than white miso and often contains more soybeans, less grain, and more salt.
- Flavor Profile: It has a more robust, deeper, and saltier flavor than white miso, with an underlying earthiness.
- Culinary Uses: Suited for hearty dishes like stews and braises.

Miso as a Seasoning for Roasted Half Chicken
- Flavor Enhancement: Miso’s unique flavor profile, combining umami, salty, and sweet tones, complements the natural taste of chicken, enhancing its savoriness without overpowering it.
- Caramelization: During roasting, miso caramelizes beautifully, giving the chicken a delightful glaze and a rich, complex flavor.
- Tenderizing Qualities: The fermentation process in miso breaks down proteins, which can tenderize the chicken, making it more succulent.
My favorite miso to use in this recipe is the garlic red bean miso (red miso) that I teach students how to make in the Cultured Guru School of Fermentation.


Caramelization of Roasted Half Chicken
- Role in Roasting: If a marinade or rub contains sugars, like honey or miso, these sugars will caramelize at high temperatures, contributing to the flavor and appearance of the chicken.
- The advantage of Half Chicken: The marinade or rub is more evenly distributed and exposed in a half chicken, allowing for better caramelization across the meat.
Speaking of caramelization, another reason I prefer to roast my chicken in halves instead of as a whole is even cooking.
- Challenge with Whole Chicken: In a whole chicken, different parts (like breasts and thighs) cook at different rates, which can lead to uneven cooking.
- Benefit of Half Chicken: Cutting a chicken in half allows heat to circulate more evenly around the meat, leading to more consistent cooking and reducing the risk of overcooked or undercooked sections.

How to Cook Roasted Half Chicken with Potatoes
Apart from the dishes you’ll dirty while preparing the chicken, this is a one-pot meal! I suggest using a shallow Dutch oven braiser for this recipe. Here are two of my favorites:
Print
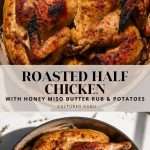
Roasted Half Chicken with Honey Miso Butter Rub and Potatoes
wow your fam for dinner with this delicious Roasted Half Chicken recipe featuring delectable Honey Miso Butter Rub and golden, crispy potatoes. Irresistible!
- Prep: 20 minutes
- Cook: 40 minutes
- Total Time: 1 hour
Ingredients
- whole chicken, (about 4-5 pounds)
- 2 teaspoons garlic powder
- 1 teaspoon onion powder
- 1 teaspoon crushed black peppercorn
- 3 tablespoons freshly squeezed lemon juice
- 3 tablespoons extra virgin olive oil
- 1 tablespoon miso
- 1 tablespoon honey
- 1/4 teaspoon dried sage
- 1 teaspoon kosher salt, (use less or more according to your liking, account for the salt in the miso)
- 1 pound tiny potatoes
For Basting
- 2 tablespoons melted butter
- 1/2 teaspoon garlic powder
- 1 teaspoon miso
Instructions
- Remove the chicken giblets and pat the chicken dry with paper towels. Cut the chicken in half (see blog above this recipe for how to halve a chicken). Set aside.
- Wash, scrub, dry and cut the baby potatoes in half. Set aside.
- Mix the Seasoning Blend: In a small bowl, mix the garlic powder, onion powder, black pepper, lemon juice, olive oil, miso, honey, sage, and salt.
- Rub the seasoning all over the chicken and marinate for 30 minutes in the fridge.
- Preheat the oven to 500°F. Mix the basting ingredients in a small bowl.
- Place the chicken, breast side up in an oven-safe skillet or baking pan then put it on the lowest rack in the oven.
- Cook for 15 minutes.
- Remove the pan from the oven, add halved potatoes onto the bottom of the chicken. Brush the chicken and halved potatoes with the basting mixture. Place the pan back in the oven on the lowest rack.
- Reduce the temperature to 425°F and continue cooking for about 20-25 minutes or until a thermometer inserted into the thigh registers 165°F. If you think the skin is getting too dark, but it isn’t done cooking, cover the pan with foil.
- Test the potatoes to make sure they are done. If they are not, but the chicken is, transfer the chicken to a cutting board and return the potatoes into the oven until cooked through.
- Let the chicken rest for 10 minutes before carving and serving.


This was delicious! Thank you!
Thank you for leaving a review! I’m happy you loved this chicken recipe. I haven’t made it in a while and I need to again soon 🙂