Using Chard Stems
I grow swiss chard in my garden every fall, and it grows well through winter since we live in Louisiana. We love using card greens in soups and stews and incorporating them into Dutch Oven Chicken Pot Pie with Sourdough Biscuits. That means that I’m always left with lots of colorful chard stems. What better way to use them than to make fermented swiss chard stems!

You can use chard stems in many ways, including cutting them up and adding them to the same soups and stews with the leaves. You can also add them to a pot of simmering bone broth to add some vitamins and minerals.
Fermenting is by far the best thing to do with swiss chard stems, though.

Chard Stems are Nutritious
Have you ever heard doctors and nutritionists say to eat a “rainbow assortment” of fruits and vegetables? That’s because colorful fruits and vegetables contain many vitamins and phytonutrients.
When you wild ferment swiss chard stems, those vitamins, and phytonutrients become more bioavailable and easier to digest. I want to mention that the colors won’t stay vibrant through fermentation, though. Everything will take on a dull yellow color by the time fermentation is complete.

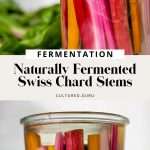
Fermented Swiss Chard Stems
This recipe is simple! The hardest part is waiting 3-4 weeks for the fermentation process to finish. Why at least three weeks? Well, here’s what happens when swiss chard stems are fermented for 3-4 weeks at about 76° F:
24 – 72 hours: All contents in the jar should be submerged beneath the brine. At this time, Gram-negative bacteria, yeasts, fungi, and possible pathogens are still present. This is normal and the natural way wild fermentation begins, with all sorts of microbes from the soil.
72 hours – 7 days: After 72 hours, you should start to see lots of bubbles produced, and the vibrant colors from the stems will begin to mix in the brine. This is where you will burp the jar (if using a mason jar). This is when the ferment enters stage two of vegetable fermentation. Leuconostoc bacteria begin to thrive and produce a lot of carbon dioxide. Gram negative organisms from stage one have all died off.
7 – 16 days: The bubbles in the brine will decrease as the ferment leaves stage two and enters stage three. The mixture will become cloudy and start to develop a pleasantly sour smell. Lactobacillus species are most abundant during this period.
16 – 28 days: Lactobacillus dominates the microbial population. They produce copious amounts of lactic acid, making the ferment smell even more pleasantly sour. This is the time in which the swiss chard stems become preserved. This is when you want to smell and taste test.

Fermented Swiss Chard
Now, you can use this recipe also to ferment green chard leaves. Feel free to mix in a few chopped chard leaves with the stems. I like to ferment the stalks and then cook the leaves in meals and recipes.
There are many ways to use fermented chard stems. Chop them and use them as you would a pickle on burgers and sandwiches. You can cook them into recipes for flavor, with more bioavailable nutrients thanks to fermentation. You can also eat them out of the jar.

Ingredients and Equipment to Make Fermented Swiss Chard Stems
Here are all the supplies and equipment you will need to make this recipe:
- 32 ounce Wide Mouth Mason Jar
- Fermentation Weight
- Standard Metal Mason Jar Lid (this can rust in the presence of salt)
- OR Rust Free Plastic Lid
- or you can use a Weck Jar (without the gasket; only use the clips to secure the lid)
- Scale
- Mixing Bowl
The ingredients are so simple:
- Swiss chard stems
- Sea Salt
- Water

Naturally Fermented Swiss Chard Stems
Don’t throw away those beautiful and colorful chard stems! Instead, use this easy recipe to make fermented swiss chard stems. Slice them and use them like you would use a pickle!
- Prep: 10 minutes
- Total Time: 504 hours 10 minutes
Ingredients
- 300 grams chard stems
- 500 grams water
- 24 grams salt
Instructions
- Cut the stems from the Swiss chard leaves and rinse them well in cool water.
- Dissolve the 24 grams of sea salt in 500 grams of water.
- Cut the stems to to fit in the jar. You can cut them in small chunks, or cut them to the height of the jar allowing room for a fermentation weight.
- Add the stems to the jar, and fill the jar with the water and salt mixture.
- Place your fermentation weight in the jar and make sure the weight and all of them stems are submerged in the salt brine.
- Place the lid on the jar and secure it closed.
- Allow for fermentation at room temperature for 3 to 4 weeks.
- During the first few days, expect a lot of carbon dioxide production. You will need to gently open the jar lid to let some of the gas out daily. At the one week mark, you should notice the bubbles decreasing and eventually stopping completely.
- After 3-4 weeks of fermenting, store the fermented chard stems in the fridge. You can check the pH with a pH strip to make sure it is below 4.