

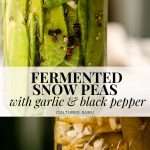
Fermented Snow Peas with Garlic and Black Pepper
This fermented snow peas recipe enhances the natural sweetness and crunch of fresh snow peas and elevates their health benefits through fermentation.
Embracing the ancient and proven technique of fermentation, you can transform the humble snow pea into a probiotic-rich powerhouse. This promotes a healthy gut, supports digestion, and adds a robust flavor to your meals. Adding garlic and black pepper creates a tangy, slightly spicy treat, perfect as a side dish, snack, or topping for salads and rice bowls.
The process of fermenting snow peas is both simple and rewarding. By submerging the snow peas in a brine solution, beneficial bacteria can thrive, producing lactic acid that preserves the peas and enhances their nutritional profile. Adding garlic and black pepper provides a pungent depth and subtle heat, resulting in a complex, savory flavor that will delight your taste buds. This unique taste not only brings a new experience to your table but also contributes to your overall well-being by incorporating the numerous benefits of fermented foods.

How to Ferment Snow Peas
The recipe makes one quart of fermented snow peas (32 ounces). I use a 3.5% total salt concentration when fermenting green beans or peas. To learn more about calculating salt concentration, CLICK HERE. Here are the simple ingredients you need:
- 370 grams snow peas
- 420 grams water
- 10 grams peppercorns
- 20 grams minced garlic
- 28 grams sea salt

Are Snow Peas Good For Your Gut?
Yes, snow peas are good for gut health. Here are a few reasons why:
- High Fiber Content: Snow peas are rich in dietary fiber, which helps promote healthy digestion by adding bulk to the stool and facilitating regular bowel movements. This can prevent constipation and support overall gut health.
- Prebiotic Properties: The fiber in snow peas acts as a prebiotic, feeding the beneficial bacteria in the gut. A healthy gut microbiome is essential for proper digestion and can improve immune function.
- Low in FODMAPs: Snow peas are low in fermentable oligosaccharides, disaccharides, monosaccharides, and polyols (FODMAPs), which means they are less likely to cause bloating and gas for individuals with sensitive digestive systems.
- Rich in Nutrients: Snow peas contain essential vitamins and minerals, such as vitamins A, C, and K, as well as folate and iron. These nutrients support overall health, including maintaining a healthy gut lining and reducing inflammation.
- Antioxidant Properties: Snow peas contain antioxidants like flavonoids and carotenoids, which can help reduce inflammation in the gut and protect against oxidative stress.
By simply including snow peas in your diet, you can take a proactive step towards a healthier gut and overall well-being.

Supplies You Need to Ferment Snow Peas
For the best flavor and texture, you should use weight measurements for your fermentation ingredients. That means you need a kitchen scale. Weighing your ingredients gives you consistent and superior fermentation results. This is the scale we use in our home kitchen.
Here is the equipment you will need to make it:
- 32-ounce Wide Mouth Mason Jar
- Fermentation Weight
- Standard Metal Mason Jar Lid (this can rust in the presence of salt)
- OR Rust-Free Plastic Lid
- or you can use a Weck Jar (without the gasket; only use the clips to secure the lid)
- Sea Salt
- Scale
- Mixing Bowl
If you would like to read more about the best jars and lids for fermenting vegetables, click here.

Fermenting Fresh Snow Peas
Fermentation naturally takes time. I recommend fermenting your snow peas for at least 14 days before eating, with 21 days being the best fermentation time for optimal flavor and health benefits.
By checking the progress of microbial stages under the microscope, we have provided you with a handy timeline below! If you follow our recipe and directions, your fermentation timeline should approximately match ours!
Note that temperature will influence how fast or slow fermentation occurs. This timeline applies between 70 ° F. and 80° F. If you keep your home colder, the process is slower. If your home is warmer, it will be faster.

Fermented Snow Peas Timeline
24 – 48 hours: All contents in the jar should be submerged beneath the brine. At this time, Gram-negative bacteria and possible pathogens are still present (nothing scary, just a natural part of the process).
48 hours – 5 days: After 48 hours, you should start to see lots of bubbles being produced. This is when the snow peas enter stage two of vegetable fermentation. Leuconostoc bacteria begin to thrive, and Gram-negative organisms die off. Leuconostoc make the bubbles.
5 – 10 days: The bubbles in the brine will decrease as the snow peas leave stage two and enter stage three. The ferment will become cloudy, the color will change, and a pleasant sour smell will develop. You should also recognize garlic and pepper smells. Lactobacillus species begin to thrive at this time.
10 – 21 days: Next, Lactobacillus make up most or all of the microbial population. They produce copious amounts of lactic acid, making the fermented snow peas smell even more pleasantly sour. This is when the vegetable mixture becomes preserved.
21 – 28 days: This is when you want to smell and taste test. Wait for the peas to smell and taste as you like, and refrigerate when you find the smell and taste most pleasant! We like ours best when we refrigerate at about 21 days, but they can go longer.


Fermented Snow Peas Care Instructions
During the first few days of fermentation: carbon dioxide and bubbles will be produced. Sometimes mason jars will become very full of liquid, and this liquid can seep out. You will need to burp the jar.
- When burping the jar, remove the lid. If necessary, tamper everything back down using a clean tamper or spoon. Ensure everything, including the weight, is submerged below the brine. You can also rinse off the lid daily to keep things clean.
- Do not worry about opening the jar and “letting air in.” It’s a myth. Opening the jar doesn’t matter at all as long as everything stays submerged in the brine and you keep the lid clean.
Always Trust your sense of smell: In the beginning, fermentation can smell quite funky. When fermentation is finished, fermented snow peas should smell pleasantly sour. Never eat anything that smells repulsive or yeasty.
Never eat anything that has mold growing on it: By following directions, you should not encounter this problem.
After 3-4 weeks, remove the fermentation weight, smell, and taste test. Your fermented snow peas should smell pleasantly sour. They should taste similar to fermented pickles. Store in the fridge.
How to Use Fermented Snow Peas
Here are five ways to incorporate fermented snow peas into various recipes:
- Add to Stir-Fries: Toss chopped fermented snow peas into vegetable or protein stir-fries for a tangy crunch.
- Top Salads: Sprinkle sliced fermented snow peas over green salads or grain bowls for added flavor and probiotics.
- Garnish Sandwiches and Wraps: Use them as a zesty garnish for sandwiches, wraps, or burgers.
- Mix into Slaws: Incorporate fermented snow peas into cabbage or veggie slaws for an extra layer of taste.
- Serve with Cheese and Charcuterie: For a unique, fermented twist, pair them with cheeses and cured meats on a charcuterie board.

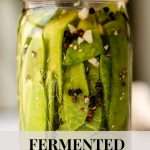
Naturally Fermented Snow Peas with Garlic and Black Pepper
Enjoy the robust flavor of peppery and garlicky fermented snow peas. Made with black pepper and fresh minced garlic, snow peas are long fermented for 21 days, giving the best flavor and making them perfect for gut health.
- Prep: 10 minutes
- Total Time: 504 hours 10 minutes
Ingredients
- 370 grams snow peas
- 420 grams water
- 10 grams peppercorns
- 20 grams minced garlic
- 28 grams sea salt
Instructions
- This recipe at 1x works best with a 32-ounce wide-mouth jar. Please see the equipment recommendations above. Please use fresh snow peas.
- Wash all of your fermentation equipment (jar, weight and lid)
- Wash your snow peas in cool water.
- Place your kitchen scale on the counter. Turn it on and set it to weigh in grams.
- Place a mixing bowl on your kitchen scale and tare/zero the scale.
- Weigh out the designated amount of snow peas, garlic, and black pepper.
- Add the snow peas, garlic, black pepper, and the designated amount of water to the jar.
- Place a small bowl on your scale and tare/zero the scale.
- Weigh out the salt. Then, add the salt to the jar.
- Secure the standard mason jar lid on the jar. Shake the jar vigorously for 2 minutes to dissolve all the salt.
- Remove the lid. Place your clean fermentation weight in the jar, submerging the snow peas and weight fully in the liquid.
- Secure the lid to the jar. When it is bubbling, burp the jar daily. You do not need to tighten it all the way. Just secure the lid but leave it ever so slightly loose so the gas doesn’t build up too much.
- Let the snow peas ferment for 14 days at room temperature. Set the jar in a glass dish to catch any spills.
- After 2-3 weeks, remove the fermentation weight, smell, and taste test. Your fermented snow peas should smell pleasantly sour
- Store in the fridge.
- If you try this recipe and love it, please leave a five-star review below!


Will have to try making this! Can I use green or yellow snow peas?
How long will they last in the fridge?
Thanks!
either type of snow peas will work. They don’t really expire and last in the fridge for a very long time.
Thanks very much for the reply!
Thanks very much for the reply!
Wonderful idea! Thank you. Worked perfectly for me and my 🫛
Hi, i’m loving your recipes and fementing a lot. Today i just came by this information about relation to fermented foods and cancer, it seems to be nitrites
i’m worried about it, what do you think?
Nitrites aren’t an issue and are barely detectable in fermented vegetables that are fermented for a proper amount of time and made with zero meat-based ingredients. There’s usually a lot of confusion about topics like this because people will read papers about Korean kimchi, but not consider the variability and impact in ingredients used.
Understand that Korean kimchi usually contains salt cured fish paste and salt brined shrimp as ingredients. Nitrates and nitrites are high in almost all salt cured meats and fish. The nitrite and nitrate levels in fermented foods come from the initial ingredients used (yes some vegetables naturally contain some of these compounds, but all living things do).
Also Lactobacilli in fermented vegetables can produce NO by breaking down nitrates and nitrites, so if you ferment vegetables for a proper amount of time, the beneficial bacteria can reduce the natural levels of nitrates found in plants.
Hi! Can I make this recipe with sugar snap peas instead? Also, I don’t have a fermentation weight. Do you have recommendations for alternatives?