

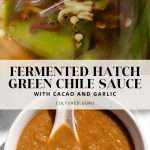
Fermented Hatch Chile Sauce
At the beginning of August, I love seeing the Hatch Chiles arrive at the store. Their seasonal arrival means it’s time to make one of my all-time favorite hot sauces: fermented hatch green chile sauce.
This hot sauce is something I threw together one summer after buying a bunch of chiles at the farmer’s market. It turned out so good that I had to write the recipe down from memory to make every year. My favorite part of this recipe is the incorporated cacao powder. It adds a good bit of beneficial, bioavailable magnesium.

Fermented Hatch Green Chile Sauce with Cacao and Garlic
Here are all of the ingredients you need to make this recipe:
- 300 grams hatch chilies (hot, mild, or medium. whichever you prefer)
- 30 grams garlic
- 50 grams white onion
- 10 grams cacao powder
- 28 grams sea salt
- 400 grams water

Are Hatch Chiles Spicy?
Hatch chiles come in a range of spice levels. Usually, you can find four kinds: mild, medium, hot, and extra hot. I enjoy mixing different spice levels in fermentation to get the best flavors.
For this recipe, I used half hot and half mild.
How to Make Fermented Hatch Chile Sauce
Making hot sauce is easy! It may initially seem intimidating to ferment hot sauce, but you’ve got this. Just follow the steps and be patient. In about four weeks, you’ll have the best hot sauce ever!
If this is your first time learning to make hot sauce, I suggest sticking to the recipe strictly. If you are an experienced fermenter, you can experiment a little bit by changing up the pepper varieties. Since hot hatch chiles aren’t always available and in season, you can evenly substitute for another kind of pepper. If you want to use, say, Anaheim peppers instead of hatch chiles, just evenly sub the weight of peppers.

Hatch Green Chile Sauce Fermentation Timeline
24 – 48 hours: All contents in the jar should be submerged beneath the brine. At this time, there are still Gram-negative bacteria and possible pathogens present.
48 hours – 5 days: After 48 hours, you should start to see lots of bubbles being produced. This is when the ferment enters stage two of vegetable fermentation. Leuconostoc bacteria begin to thrive, and Gram-negative organisms die off.
5 – 10 days: The bubbles in the brine will decrease as the ferment leaves stage two and enters stage three. The ferment will become cloudy, the color will change, and a pleasant sour smell will develop. You should also recognize garlic and pepper smells. Lactobacillus species begin to thrive at this time.
10 – 21 days: Next, Lactobacillus make up most or all of the microbial population. They produce copious amounts of lactic acid, making the fermented chiles smell even more pleasantly sour. This is when the vegetable mixture becomes preserved.
21 – 28 days: This is when you want to smell and taste test. Wait for the peppers smell and taste as you like, and then blend and refrigerate when you find the smell and taste most pleasant! We like ours best when we blend up the hatch green chile sauce and refrigerate at about 25 days.

Hatch Green Chile Sauce Fermenting Instructions
During the first few days of fermentation, carbon dioxide and bubbles will be produced. Sometimes, mason jars will become very full of liquid, and this liquid can seep out. You will need to burp the jar.
- When burping the jar, remove the lid and tamper everything back down using a clean tamper or spoon. Make sure everything, including the weight, is still submerged below the brine. You can also rinse off the lid daily to keep things clean.
Always Trust your sense of smell: In the beginning, fermenting hatch chile can smell funky (but in a good way). When fermentation is finished, the chiles should smell pleasantly sour and have hints of garlic and onion. Never eat anything that smells repulsive or yeasty.
Never eat anything that has mold growing on it. By following directions, you should not encounter this problem.
Note that most vine-growing vegetables that are wild fermented will have something called pellicle growth. This is completely normal for what I call “vine-growing” vegetables (anything that grows from a blossom) as long as it does not look furry, pink, blue, black, green, or magenta.
A safe pellicle is normally opaque, off-white, and kind of crinkly. If you have surface growth like this, it’s a harmless mixed colony of wild yeasts. It’s not “mold.” You can skim it off the top and still eat your peppers. See the two pictures below as a reference for what a normal pellicle looks like.


How to Avoid a Pellicle
I used an approximate 3.5% total (w/w) salt concentration for this recipe. I usually avoid pellicle growth completely by increasing the salt concentration of the pepper fermentation.
Peppers can be fermented with up to 10% salt concentration. That’s way too salty, in my opinion. But I’ve tried many fermented peppers at 6% total salt concentration, and I’ve never had pellicle growth with a total salt concentration of 6%. The yeasts simply do not tolerate such high salt concentrations.
This, of course, is a much saltier pepper ferment. However, the hatch green chiles come out more sour, too, and this is perfect for hot sauce! I like to blend the higher-salt fermented peppers with apple cider vinegar for a perfect, full-flavored hot sauce.

Supplies You Need to Ferment
- 32 oz Wide Mouth Mason Jar
- Fermentation Weight to fit your mason jar
- Standard Metal Mason Jar Lid (this can rust in the presence of salt)
- OR Rust Free Plastic Lid
- Unrefined Sea Salt
- Scale
- Mixing Bowl
- or you can use a Weck Jar (without the gasket; only use the clips to secure the lid)
- Blender (this is necessary for puréeing the fermented hatch chiles. If you don’t have a blender, a food processor works well too).
- Funnel
- Glass bottle or jar for the finished hatch green chile sauce

Blending Hatch Green Chile Sauce
After about four weeks, your hatch chiles will be done fermenting. To make the hot sauce, blend the contents of the fermentation jar in a blender until smooth. You won’t use all the brine for blending and can incorporate vinegar to balance the flavor.
You can also strain the pulp out of the blended sauce for a thinner hot sauce. However, I love to leave all the pulp in for a thick hot sauce.


More Fermentation Recipes to Try
- Fermented Pepperoncini Peppers Recipe
- Pepper Fermentation Recipe: Learn How to Ferment Any Type of Pepper
- Fermented Lemon Pepper Fries Fried in Duck Fat

Fermented Hatch Green Chile Sauce with Cacao and Garlic
My favorite hot sauce to make every August is fermented hatch green chile sauce. I incorporate cacao and garlic for a unique and vibrant flavor. This hot sauce goes great on tacos, burgers, burritos, and enchiladas.
- Prep: 10 minutes
- Cook: 10 minutes
- Total Time: 672 hours 20 minutes
Ingredients
- 300 grams hatch chiles
- 30 grams garlic
- 50 grams white onion
- 10 grams cacao powder
- 28 grams sea salt
- 400 grams water
Instructions
- At 1x, this recipe works best with a 32-ounce jar.
- Add the cacao powder, salt, and half the water to a small saucepan and heat over medium heat until it simmers. Stir continuously until the cacao powder and salt are dissolved. Set aside.
- Wash your fermentation equipment, including the jar, weight, and lid.
- Wash your chiles and chop them into halves or rings. Peel and chop the onion and garlic.
- Place your kitchen scale on the counter. Turn it on and set it to weigh in grams. Place your jar on the scale and tare/zero.
- Add the designated amounts of chiles, garlic and onion to the jar. Add in the the salt/cacao water, and remaining water.
- Place your standard mason jar lid on the jar, and secure it. Shake the jar for 2 minutes.
- Remove the standard mason jar lid. Place your fermentation weight in the jar, making sure to submerge all of the pepper pieces and weight fully in the liquid.
- Secure the jar lid to the mason jar.
- Ferment for 4 to 5 weeks.
- After fermentation, remove the fermentation weight. Strain the chiles, onion, and garlic from the brine, reserving all the liquid.
- Add the peppers, garlic, and onion to a high-speed blender.
- Blend on high, slowly adding small amounts of reserved brine into the blender until it blends easy and the desired consistency is reached. You can also add vinegar to balance out the flavor.
- Store in an airtight container in the fridge. Separation is natural; shake to combine before using. Use a spoon to sprinkle over your food.


I used your exact recipe and there is not enough liquid to cover my peppers??????
Hey there, we were having some web/server issues, so you may have been using an incorrect version of the recipe. Sorry about that! The recipe should be correct now.
I am making this with ripe Serrano peppers I grew on my balcony–a double batch, so wish me luck. I noticed there are loose pepper seeds floating at the surface of the brine now that enough of the cocoa has settled that I can see them (a couple of hours). Will the seeds absorb water and lose their buoyancy or do I need to open it up and skim them off with a sterilized spoon?
Unfortunately, the seeds will remain floating. I would try and skim them out.
If you leave the seeds, you may have a yeast pellicle grow on the surface… but with the salt concentration in the recipe, it won’t be anything dangerous, just harmless yeast.
Thank you for the prompt response! I was hoping this would be early enough in the process I wouldn’t re-introduce oxygen at the wrong time. Several pieces of roasted garlic were floating around when I opened it and I’m glad I did. I am using the Ball Fermentation Kit (because I could get it locally) and the spring-loaded potato masher probably needed a piece of cabbage under it to trap all the floaties. Except that might trap CO2 bubbles…
I think I’ll like the flavor combo when it’s done. When I was cleaning up the first day, I tasted the brine on the lid used for shaking the mixture and the hot/garlic/bitter cacao flavor was very interesting in a good way.
Hi, can you wash peppers before fermenting them. I chop my habanero or jalapeños in half and throw them in a sink full of water. This keeps the eyes from watering too much when doing several kg of peppers and as a bonus gets rid of quite a few loose seeds. I wondered if this might remove too much of the natural biome and retard fermentation? The current batch is bubbling away in the fermentation crocks but it seems a little slow. However it’s late autumn here now and nights are cool.
I also wondered if you add fresh unfermented peppers to fermented ones, (in a non cooked sauce); to blend and balance a sauce; do you run the risk of restarting fermentation since you are introducing fresh carbohydrates. I assume the addition of vinegar in the final sauce will inhibit further fermentation plus refrigeration.
Hi there!
Yes, you should always wash peppers before fermenting them. A rinse in freshwater works well. What you do to rinse and remove the seeds shouldn’t change the pepper microbiome, and fermentation should still occur. If your temperatures are cool, fermentation will be slower, but if you see bubbles, everything is fine.
You can add fresh peppers to blend into a sauce but keep the ratio of added fresh peppers low; fermentation shouldn’t “restart” if you add the vinegar and refrigerate.
Hi, say you wanted to make a hot fermented style sauce with Habanero peppers and add peach or mango to the uncooked type sauce. Could you add the fruit fresh to the fermented pepper base? How might this affect shelf life in the fridge? I assume adding no more than 10% fresh fruit addition would be fine?
Could you ferment the fruit? I assume you would do this like you do tomatoes i.e. for 48 hours only in sauerkraut brine and ACV. Then add this to the fermented peppers done for 4-5 weeks as usual.
In either situation I assume adding fruit might raise pH thus the addition of ACV to the final sauce to get it to around 3.5 might be needed?
Thanks
Another thought, could I use the brine from my 4 week old pepper ferment with some ACV to ferment the fruit for 48 hours instead of sauerkraut brine?
I’ve never tried it, so I’m not 100% sure! let me know how it turns out if you experiment with it.
It depends on the acidity and FODMAP content of the fruit. All fruits ferment differently.
Wondering if you can roast the hatch chili for this recipe
Can i use unsweetend cocoa powder instead of caccao?
I haven’t tried it, but I think it could work.
Hi there, I made this a couple of years ago and really liked it. About to try it again. Wasn’t the garlic roasted before? I see this recipe calls for fresh garlic. Is there a difference in the taste? Also, would roasted garlic or fresh garlic in the ferment be lower fodmap (fructans) at the end? Super appreciate all your recipes!
I retested and rewrote the recipe this summer! You can still roast the garlic. It’s great roasted. I do not think it’s any lower fodmap roasted. cooking doesn’t decrease fodmaps. A longer fermentation would be lower fodmap though.
Wasn’t sure that i liked this salsa at first, but then i realized that it should be blended instead of processed. Into the Vitamix it went and like magic, all of the flavors came together and i am pretty happy!
ah yes! it needs heavy duty blending! Glad you like it now 🙂
Excellent recipe! I went through all the steps, and after 4 weeks, I have a bunch of beautifully green and delicious sauce that I can’t wait to share with friends and family! I think I may have doubled the recipe to fill my crock. I left out the cacao because I wanted a really clean hatch chile flavor, but I’ll incorporate it next year and see if I like it any better. The hardest part of this recipe was waiting, but it was absolutely worth the wait. Thank you for sharing!!
Thank you for leaving a review! I’m happy to hear you loved the recipe. (and yes, waiting is always the hardest part!)
10/10, no notes. Followed the recipe exactly, and it made for incredible fermented hot sauce.
Just bottled it up today and it was worth the wait!
Thank you for leaving a review! So glad you love the hot sauce!