

When crafting beverages like mead, cider, beer, and wine, many people immediately think of carefully cultivated yeast strains. However, there’s a fascinating world of wild yeast you can explore.
In this blog post, we’ll delve into the art of culturing yeast for your brewing adventures. From understanding what wild yeast is to capturing it from various sources and why it’s a fantastic choice for mead and cider, we’ll guide you through the exciting process of working with nature’s untamed microorganisms.

What is Wild Yeast?
To brew anything with wild yeast, you first need to understand what wild yeast is. Wild yeast is a broad category of yeast strains that exist naturally in the environment.
Unlike commercially available yeast strains, we do not isolate and cultivate wild yeast to sell in convenient packets. Instead, we can find yeast on various organic materials, such as fruits, flowers, and even in the air around us. These yeast strains are opportunistic and can thrive in the right conditions, converting sugars into alcohol and carbon dioxide during the fermentation process.
Since we’re cultivating them from ingredients, it’s so, very important that we use organic ingredients and fruits that have a healthy microbiome. Homegrown and farmers market fruits are the best.

The History of Brewing Alcohol with Wild Yeast
The use of natural yeast for brewing dates back thousands of years. Early brewers didn’t have access to pure yeast strains, so they relied on the untamed yeast in their surroundings.
Historical records show that ancient civilizations in Mesopotamia, Egypt, and China used wild yeast to ferment grains, fruits, and honey into alcoholic beverages. The unpredictability of wild yeast often led to unique and diverse flavors, making each batch a surprise.
Today, this time-tested and reliable tradition lives on with craft brewers and homebrewers who appreciate the complexity and character that wild yeast can bring to brewed beverages.

How to Grow Natural Yeast in Sugar Water
Cultivating yeast from nature for your brewing is relatively easy. Here’s a step-by-step guide on how to grow wild yeast in sugar water:
Equipment and Ingredients:
- A clean glass jar
- a lid for your jar
- Non-chlorinated water
- Organic sugar (such as cane sugar or honey)
Steps:
- Sanitize Your Equipment: It’s crucial to ensure that your glass jar and any other utensils you use are clean and sanitized to avoid unwanted microbial growth.
- Prepare Your Sugar Water: In your glass jar, mix approximately 150g of organic sugar with 400 grams of filtered water. Stir until you dissolve all the sugar.
- Add Organic Fruit: The key to capturing yeast is to introduce it into your sugar solution. You can use organic fruits and edible flowers. For example, add a few grapes, figs, or a slice of organic apple to your sugar water. Lightly rinse the fruit to remove any bugs before adding it to the sugar water.
- Cover and Wait: Cover the jar loosely with the lid, but tight enough to stop fruit flies from getting in. Twice a day, tighten the lid and shake the jar, then loosen the lid again.
- Observe Fermentation: You’ll notice bubbles and a pleasant, yeasty aroma as the yeast takes hold. This fermentation process may take 3-5 days.
- Use or Store: Once your yeast culture is active and bubbling, you can use it for brewing immediately or store it in the refrigerator for future use. Remember to feed your yeast some sugar solution (150 g sugar dissolved in 400 grams water) periodically to keep it active and healthy.


The Best Fruits for Capturing Yeast
The choice of organic material you use to capture wild yeast can significantly impact the flavor profile of your brew. Here are some fruits that are known for having great wild yeasts.
- Grapes: Grapes, particularly the white varieties, are excellent for capturing yeast. The natural bloom on grapes harbors wild yeast, making them a perfect choice for starting your culture. Always use organic grapes. Homegrown grapes or muscadine are great options.
- Apples: Apples, primarily homegrown apples, can produce a fantastic yeast starter. The skin and the surface of homegrown apples are rich in yeast cells.
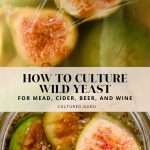
- Figs: The fuzzy skin of figs can also contain natural yeast strains. Use organic, homegrown, freshly picked figs for the best results. I went with some homegrown sierra figs for my starter.
- Berries: Blackberries, raspberries, and strawberries are great options to capture yeast. The tiny crevices on the skin are ideal hiding spots for these microorganisms. Always use organic, homegrown, and freshly picked berries.
- Plums: The naturally occurring yeast on plum skins can yield unique flavors in your brew.
- Flowers: Certain flowers, like elderflowers or lavender, can also capture yeast. Research the flowers you plan to use, and ensure they are edible, as some may be toxic.

Why Wild Yeast is Great for Mead and Cider
Using wild yeast for mead and cider-making:
- Complex Flavors: Wild yeast strains introduce a wide range of flavors and aromas that can be hard to replicate with commercial yeast. This complexity can add depth and character to your beverages.
- Unique Terroir: Just as grapes from different regions impart unique terroir to wine, wild yeast from your local environment can create a distinct regional character in your mead and cider.
- Creativity: Working with wild yeast allows for experimentation and creativity in your brewing process. You’ll discover new flavor profiles and may even develop your signature style.
- Sustainability: Capturing and using wild yeast aligns with sustainable and eco-friendly brewing practices, reducing the need for commercial yeast production.
- Connection to Tradition: Brewing with wild yeast harks back to ancient brewing traditions.
Culturing yeast for mead, cider, beer, and wine is fascinating. It allows you to tap into the time-tested practice of brewing with natural microorganisms while creating unique and complex flavors.
Recipes To Use Your Yeast Culture With
- Homemade Hard Pumpkin Cider with Warm Fall Spices
- Homemade Peach Cider Recipe with Honey (Peach Cyser)
- How to Make Watermelon Wine with Honey (Watermelon Mead)

Culturing Wild Yeast for Mead, Cider, Beer, and Wine
Learn to culture wild yeast for mead, cider, beer, and wine brewing. This natural yeast starter uses homegrown, freshly picked figs, but you can use many different fruits and edible flowers to culture wild yeast.
- Prep: 10 minutes
- Total Time: 72 hours 10 minutes
Ingredients
- 250 grams figs*
- 400 grams water
- 150 grams organic cane sugar
Instructions
- Sanitize Your Equipment: It’s crucial to ensure that your glass jar and any other utensils you use are clean and sanitized to avoid unwanted microbial growth.
- Prepare Your Sugar Water: In your glass jar, mix approximately 150 grams of organic sugar with 400 grams of filtered water. Stir until you dissolve all the sugar.
- Add Fruit: lightly rinse the fruit. Add the figs (or other fruit) to your sugar water.
- Cover and Wait: Cover the jar loosely with the lid, but tight enough to stop fruit flies from getting in. Twice a day, tighten the lid and shake the jar, then loosen the lid again.
- Observe Fermentation: You’ll notice bubbles and a pleasant, yeasty aroma as the yeast takes hold. This fermentation process may take 3-5 days.
- Use or Store: Once your yeast culture is active and bubbling, strain out all the fruit and use the strained liquid for brewing immediately, or store the strained liquid in the refrigerator for future use. click here for brewing recipes.
- Feed: If you haven’t used any for brewing, discard half and then feed your yeast some fresh sugar solution (150 g sugar dissolved in 400 grams water) once a month to keep it active and healthy.
Notes
- You can use many kinds of wild or homegrown fruit. Fruit from the store can also work, but it must be organic and it won’t work as well as freshly foraged or homegrown fruit.
- Do not use conventional store-bought fruit.


Hi, do you strain the figs/fruit out once its begun bubbling? I made this last week and it is bubbling but the figs have turned mushy and there’s a layer of mush on the bottom of the jar now, I’m wondering if it’ll negatively impact the starter if I remove the mush. Thank you!
hello! yes, you can strain it through a fine mesh strainer or some cheesecloth.
Hi nice recipe and informative.one question after it has fermented i throw the fruits and i put the liquid in the fridge?and second how much of the fermented liquid i use to make mead cider wine? Aaa also what is the percentage of alcohol? Thanks!!;;
yes, you strain out the fruit and keep the liquid. You can follow the recipes on my blog to brew different ciders and wines. Each individual recipe has a note on how much wild yeast starter you should use. Some of my favorite recipes are linked about this recipe card.
Hello! After getting a starter going, how do I maintain its health? Like a sourdough starter, do I take just a few tablespoons of starter liquid and give it the sugar water mixture? Do you have specific numbers I could base off of?
Thanks!
Good morning Kaitlynn,
Great website! I enjoy your recipes and the knowledge you share.
Questions about the figs: in the pictures the fruit in the jars appears to be green or un-ripened and some appear to be cut in half while some look to be whole.
Should the fruit be green or ripe to make the yeast?
Is it better to cut the fruit or is the yeast starter culture on the surface to the fruit?
Thank You and keep up the good work.
BBC
Thanks! The figs are green because they are Sierra figs. They we’re perfectly ripe when I used them. The yeast are on the surface of the fruit, but cutting some helps release flavors and fruit sugars into the mix.
Hi! Thanks for this recipe! I have read somewhere that it’s important to lower the PH with lemon for example, to make sure only the desired yeasts will develop, but I see that different very serious persons don’t do it, so I have the impression I’m missing something… I would be very grateful if you could help me to understand ! Thanks!
I don’t know where you read that, so I can’t really comment on the validity of the statement. Generally, having “desirable” yeast vs undesirable yeast is going to be determined by the quality and sourcing of the fruit you use to culture the yeast. Like organic, homegrown, compost grown fruit is going to have a better microbiome than conventionally grown grocery store fruit.
Thank you for this! I tried with elderflower once but was kind of guessing the ratios and it didn’t work. Will try again now! Question: in your ginger bug recipe, you add a pinch of salt. Would that be helpful for this, too?
It can be helpful if you want to use it for lower alcohol beverages! The tiny pinch of salt with the initial establishment helps ensure wild good bacteria culture in there too, not just yeast.
when feeding the culture do you have to take it out of the fridge and bring it to room temperature to feed (similar to a sourdough) or is it okay to be cold and throw it right back into the fridge?
You can feed it and pop it right back in the fridge so it will slowly use the sugars.
also is it normal for it to have a slight vinegary aroma? perhaps I left it out on the counter for too long? I tried a mead recipe with this wild yeast culture im wondering if it will make it taste too much like vinegar. maybe it will turn out like an alcoholic kombucha, either way im excited to experiment and learn more about fermenting!!
Hi, thanks for the recipe! I’m wondering if the 250g goes for flowers, too. I harvested a bunch of elderflower yesterday, and it was still probably only a few grams.
oh no! flowers are soooo light, that would require a massive jar! Just fill a quart jar about halfway with flowers 🙂